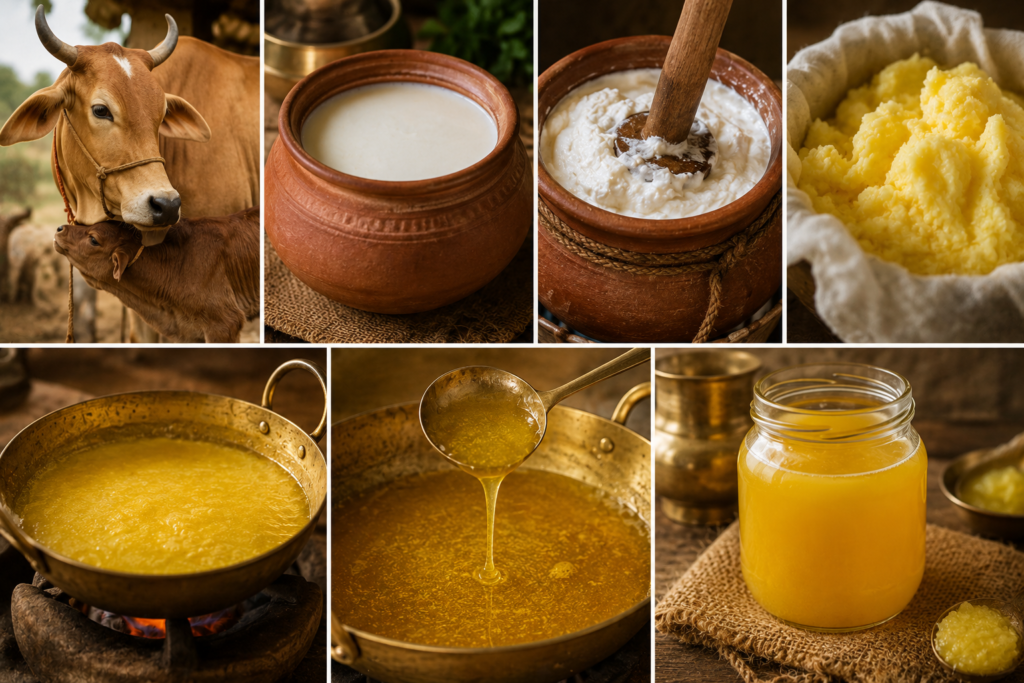
If you’ve ever seen your grandma or a village aunty make ghee at home, you know it’s not something you do in a rush. Learning how to make A2 Bilona ghee properly means slowing down, and following a rhythm that Indian households relied on for generations, long before factories and machines got involved. It’s a little patience but the deep aroma and grainy golden texture is really worth the wait. That’s exactly how the procedure works, step by step.
What You Need Before You Start
Before jumping into the A2 Bilona ghee making process, it helps to have everything laid out in front of you. Half the frustration people run into comes from realizing midway that they’re missing something basic, so it’s worth getting organised first.
- A2 milk: Fresh milk from indigenous cow breeds, such as Gir works best, since that’s what naturally carries the A2 protein rather than A1.
- A curd starter: A small spoonful of existing curd, enough to culture fresh milk overnight and get fermentation going.
- A wooden Bilona (churner): This traditional hand-churning tool gives the whole method its name, and makes a genuine difference to the final texture.
- A heavy-bottomed pan: You’ll need something sturdy for the slow-heating stage later, since thin pans scorch the butter unevenly.
- Patience and time: This isn’t a rushed, one-hour recipe. Set aside the better part of a day rather than squeezing it between chores.
Step-by-Step Traditional Bilona Method for Ghee
Once you’ve got everything ready, the traditional Bilona method for ghee follows a fairly clear five-stage journey. Every step earns its place; skip one, or rush it, and you’ll notice the difference in the final jar.
- Curd setting: Fresh A2 milk is left to culture into thick, rich curd overnight, letting natural fermentation quietly do its work while you sleep.
- Bilona churning: The next morning, the set curd gets churned by hand using the wooden Bilona, a slow, steady motion that gradually pulls the fat apart from the rest.
- Butter separation: Fresh makkhan, or butter, rises to the top as you churn, and it’s gently skimmed off and collected.
- Slow heating: This butter is patiently simmered over low heat until the water content cooks off, and that’s when the warm, nutty aroma everyone associates with real ghee finally shows up.
- Cooling and jarring: Once done, the finished ghee is left to cool slightly before being sealed into a clean, completely dry, airtight jar.
What Happens During the Final Ghee Preparation?
The last stage, after the butter has been separated, where the butter slowly takes on the familiar character of ghee. This part of Bilona ghee preparation is mainly controlled heating and careful separation.
Removing moisture The soft heat helps evaporate the water in the butter.
- Clarification of Butter: As the butter clarifies, the remaining milk solids settle down slowly.
- Aroma Development: The slow cooking process aids in developing the unique aroma that is characteristic of traditionally made ghee.
- Final Filtering: The clarified ghee is strained to remove the separated solids.
- Storage: After cooling, the finished ghee is kept in a clean, dry container.
How Traditional Cow Ghee Making Differs From Store-Bought
It helps to understand how traditional cow ghee making compares to factory production, because that difference explains why real A2 cow organic ghee tastes so different from a supermarket tub.
- No shortcuts taken: A lot of commercial ghee skips the curd stage altogether, separating cream directly from milk instead.
- Low, slow heat: Mechanised production almost always uses faster, higher heat to save time, at the cost of both nutrition and aroma.
- Small batches only: Traditional Bilona ghee can’t be mass-produced at scale without losing the very qualities that make it special.
- No additives needed: A batch made properly this way doesn’t need preservatives or added colour to stay fresh.
Storing Your Finished A2 Bilona Ghee
Once your batch is ready, proper storage keeps it fresh for months without ever needing a fridge.
- Keep it sealed: Always close the jar tightly right after use so moisture doesn’t sneak in.
- Away from sunlight: A cupboard that is cool and dry is better than a shelf near a sunny window.
- Use a dry spoon: Even a slightly moist spoon can introduce enough moisture to cause spoilage over time.
- Texture changes expected: Ghee may become grainy (semi-solid) or fully liquid depending on room temperature. This is normal and not a sign of spoilage.
Conclusion
Once you get the rhythm of making A2 Bilona ghee at home it is genuinely satisfying. Curd, churn, separate, heat and jar. If the process feels like a little more time and effort than you have to give right now, brands like Bilonika follow this very same traditional way in small, handcrafted batches, so you can still take home that same authentic taste without the churning.
FAQs
How long does the A2 Bilona ghee making process take?
The entire process, including the overnight setting of the curds, usually takes more than 24 hours from start to finish.
Can I make Bilona ghee without a wooden churner?
A hand blender can work in a pinch, but a proper wooden Bilona gives you a noticeably more traditional texture and aroma.
Why does homemade A2 cow ghee smell different from store-bought ghee?
The slow-heating stage develops a deeper, nuttier aroma that faster commercial methods usually just don’t have time for.
Does Bilona ghee need refrigeration?
Not at all, as long as it’s stored properly in a sealed, airtight jar away from direct sunlight, it stays fresh at room temperature.
Is A2 Bilona ghee healthier than regular ghee?
Many people genuinely find it easier to digest, largely thanks to the A2 protein source and the minimal, additive-free processing involved.